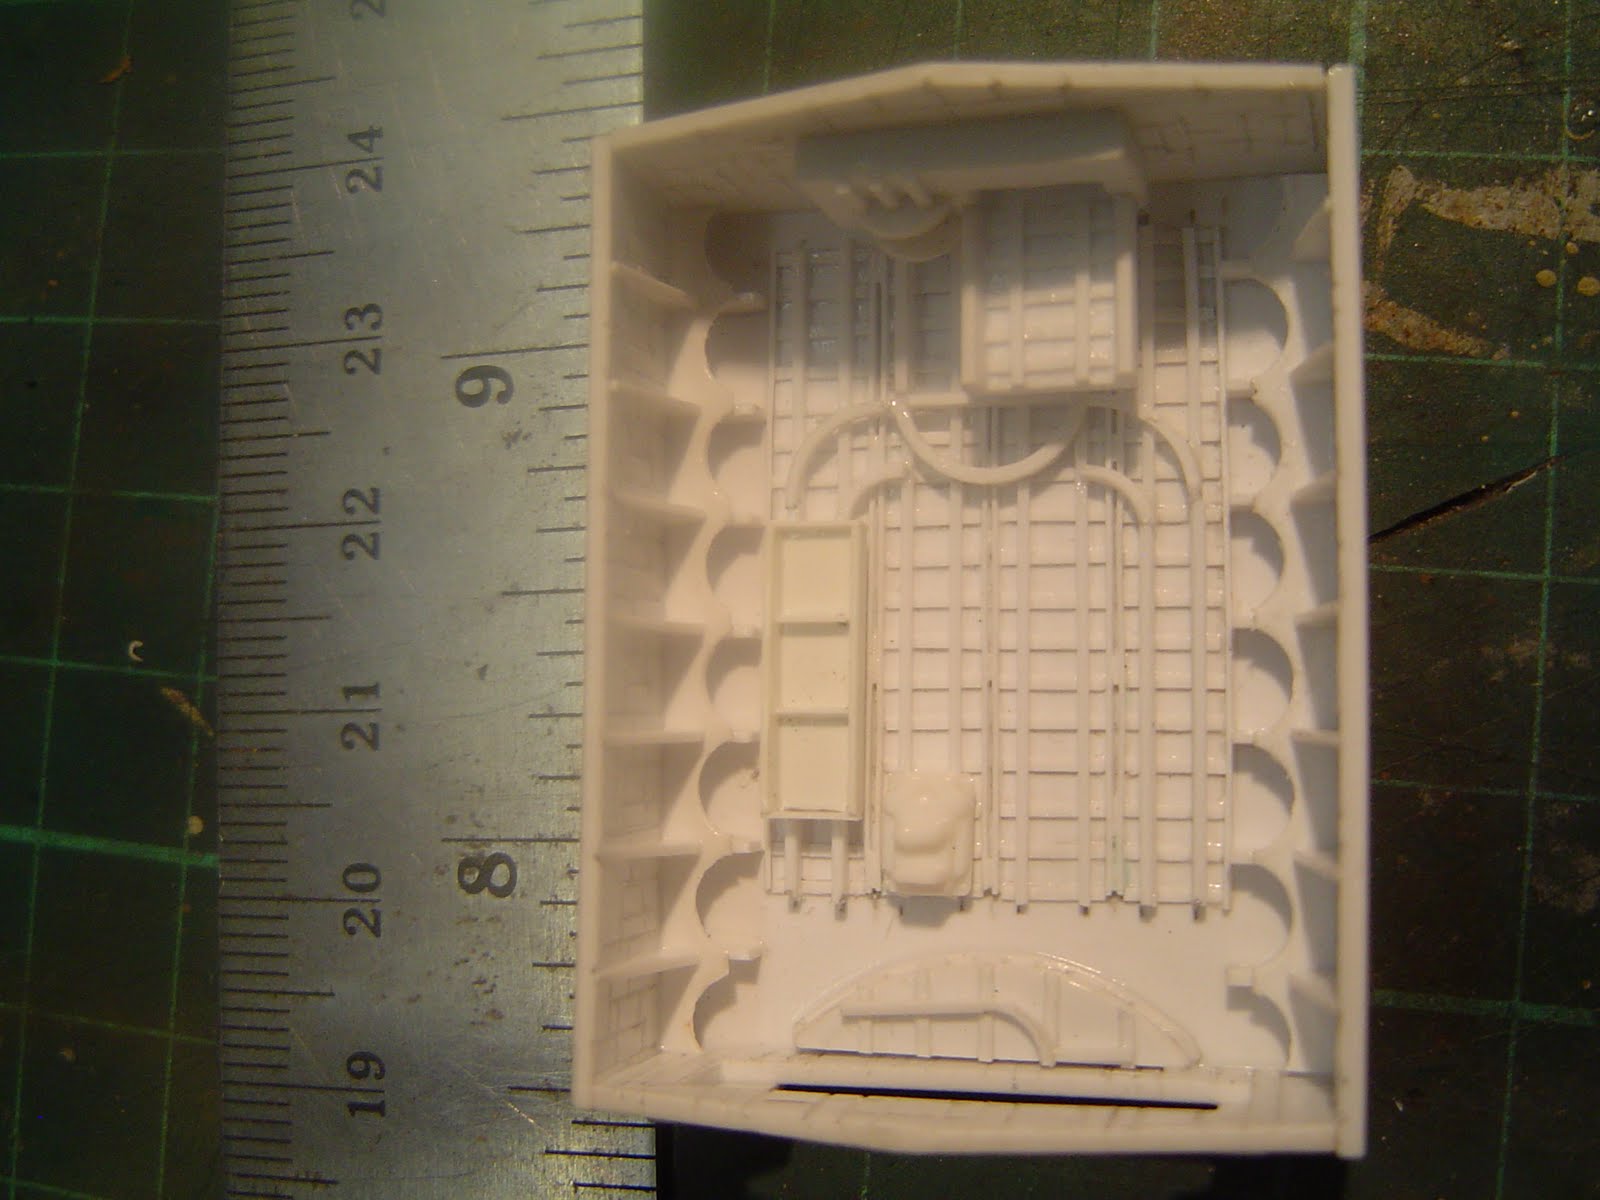
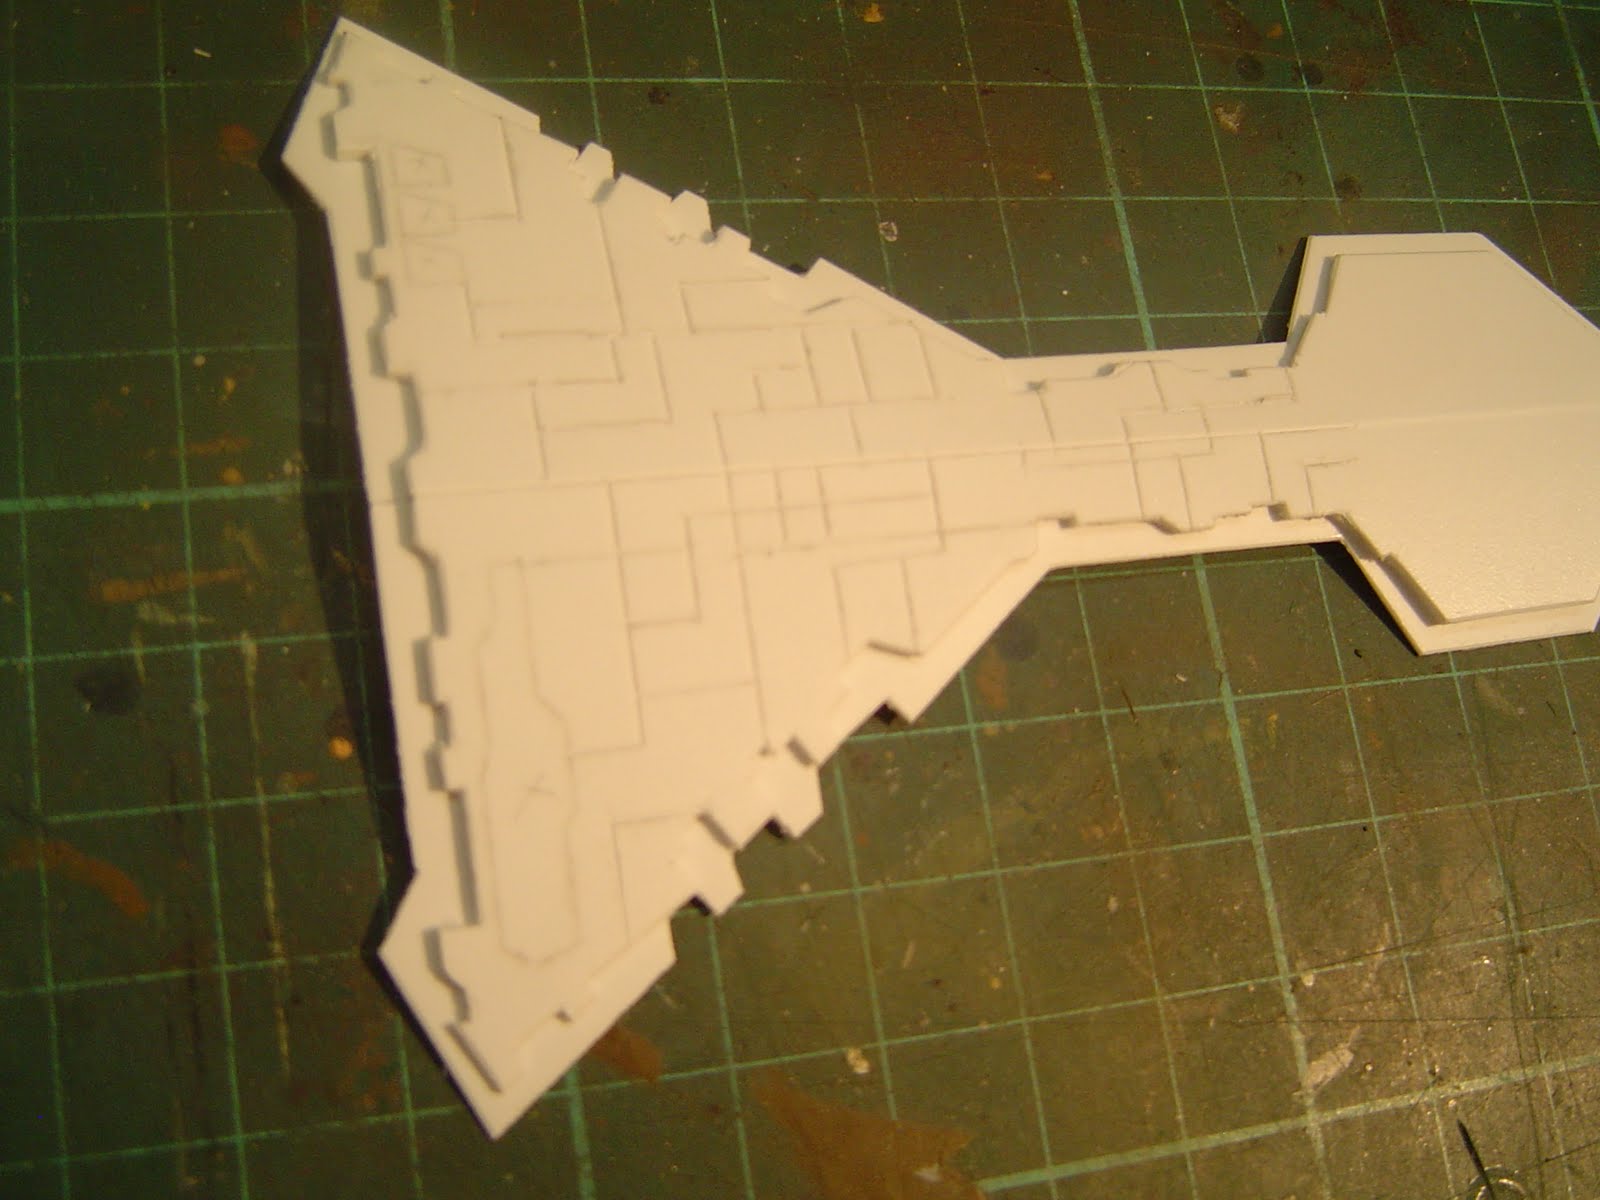
Here is the forward shuttle bay completed, unfortunately all of the construction pics were too blury to use. However the shuttle bay was assembles from 4 walls and a top, these being scribed and detailed with strip styrene as required.
The main hanger door was cut out from the forward wall and a recessed door made up. The door had to be displayed closed however as I carelessly positioned an internal bulkhead in the space this hanger would occupy.
The rear wall had a couple of greeblies added (grey parts in photo above). Can you see what they are? They are 1:72 scale german infantry gas mask containers from a dragon set!
The triangular raised hull sections were cut from 2mm styrene sheet, scribed and glued into place.
These finish off and give the forward shuttle bay the correct look from the studio model references that I have.
Finally an overall view of the underside, nearing completion of thebasic construction, just the surround of the main hanger bay left to do. The entire hull top and bottom will ultimately be covered with an array of shapes cut from sheet styrene, but I plan to do this last to maintain a consistent look to the ship.
I plan to start working on the superstructur on the upper hull next - so stay tuned,
Cheers,
Thursday, July 15, 2010
Tuesday, July 13, 2010
Reactor Dome
I think that I had some success with the reactor dome. I used a table tennis ball and a draftsmans circle template to mark the diameter I was after onto the ball then a razor saw to carefully cut it out.
The only problem I had was that regular Tamiya extra thin glue did not affect the table tennis ball, so I had to resort to thin super glue. I have also started to add some detailing to the reactor dome, but there is more to be done. All in all I think it looks about right as far as size and height go.
I also have done a test fit of the maion hanger bay to the lower hull.
I got this to fit with just a little sanding, scraping and fiddling. I'm pretty happy with the result so far and it now just needs to have the edging shrouds made and fitted to finish it off.
My next poit of work will be the forward shuttle bay, so stay tuned....
Cheers,
The only problem I had was that regular Tamiya extra thin glue did not affect the table tennis ball, so I had to resort to thin super glue. I have also started to add some detailing to the reactor dome, but there is more to be done. All in all I think it looks about right as far as size and height go.
I also have done a test fit of the maion hanger bay to the lower hull.
I got this to fit with just a little sanding, scraping and fiddling. I'm pretty happy with the result so far and it now just needs to have the edging shrouds made and fitted to finish it off.
My next poit of work will be the forward shuttle bay, so stay tuned....
Cheers,
Monday, July 12, 2010
Main Hanger Bay
After a brief but enjoyable holliday, its back to work on this project.
The lower hull is getting close, I have been searching for the right shaped dome for the main reactor. I think I have found something that will work - but more on that later.
The tapered inserts have all been completed satisfactorily, by cutting a slot in the hull tat they fit into snugly.
I'm happy with the results achieved with these.
The main hanger bay is also nearing completion, with only the hanger deck interior to be added.
More to come so stay tuned....
Cheers,
The lower hull is getting close, I have been searching for the right shaped dome for the main reactor. I think I have found something that will work - but more on that later.
The tapered inserts have all been completed satisfactorily, by cutting a slot in the hull tat they fit into snugly.
I'm happy with the results achieved with these.
The main hanger bay is also nearing completion, with only the hanger deck interior to be added.
More to come so stay tuned....
Cheers,
Tuesday, June 29, 2010
Hull Fitting and Details
The trench backing was added to the lower hull using styrene 'C' channel, this will be the surface all of the greeblie detail will be added to for the trench detail.
The upper hull was joined together using 2mm styrene bulkheads cut to the correct angle. The hull extension plates were then added around the edge of both hulls using 0.5mm thick styrene strip.
Details have been added to the lower hull including the main reactor spine, this was created using a sandwich of 0.5mm thick styrene and 1mm thick styrene to give the stepped shape. Other detail panels on the lower hull were cut from 0.25mm and 1.5mm styrene sheet.
Detail parts were also added to the upper hull using 2mm thick styrene, these parts sit over the center line so they had to be scribed down the center on both sided and bent to match the shape of the upper hull.
Back on to the lower hull, there are some parts that taper from 2mm at the front edge to flush at the rear edge. After quite a bit of thought on how to do these I decided to make a cut out in the lower hull for the parts to fit into at the rear and sit proud at the front.
This worked quite well and I will be able to add the other 2 panel on the lower hull like this.
Stay tuned for more,
Cheers,
The upper hull was joined together using 2mm styrene bulkheads cut to the correct angle. The hull extension plates were then added around the edge of both hulls using 0.5mm thick styrene strip.
Details have been added to the lower hull including the main reactor spine, this was created using a sandwich of 0.5mm thick styrene and 1mm thick styrene to give the stepped shape. Other detail panels on the lower hull were cut from 0.25mm and 1.5mm styrene sheet.
Detail parts were also added to the upper hull using 2mm thick styrene, these parts sit over the center line so they had to be scribed down the center on both sided and bent to match the shape of the upper hull.
Back on to the lower hull, there are some parts that taper from 2mm at the front edge to flush at the rear edge. After quite a bit of thought on how to do these I decided to make a cut out in the lower hull for the parts to fit into at the rear and sit proud at the front.
This worked quite well and I will be able to add the other 2 panel on the lower hull like this.
Stay tuned for more,
Cheers,
Thursday, June 24, 2010
Main Hanger Bay Roof
I have been working on the intricate detail that is on the main hanger bay roof. Again I started by using carbon paper to transfer the lines onto the plastic part I had cut for this peice.
Once the lines were transfered on to the plastic I started to make all of the rail details using very fine strip styrene 0.2x0.5mm. Many layers of styrene detail peices were required to achieve the correct look.
At this point I still have to add the curved rail details and the carriages (for want of a better description). Then the supports for the curvy light baffle can be added and the large curved contol room at one end can be made...
Time consuming stuff,
Cheers,
Once the lines were transfered on to the plastic I started to make all of the rail details using very fine strip styrene 0.2x0.5mm. Many layers of styrene detail peices were required to achieve the correct look.
At this point I still have to add the curved rail details and the carriages (for want of a better description). Then the supports for the curvy light baffle can be added and the large curved contol room at one end can be made...
Time consuming stuff,
Cheers,
Tuesday, June 22, 2010
Basic Assembly Part 1
After my mammoth scribing session I was left with a pile of flat parts.....
The main lower hull parts were glued together at the bulkheads to establish the correct angle. The seam was then glued and reinforced in the inside with some stretched sprue melted into the seam with liquid glue.
The internal bulkheads were reinforced with some styrene angle glued into place.
Additional plating was then cut out and added to the lower hull.
Here you can see the upper hull parts, the lower reactor spine parts and the rear angled engine bulkheads all cut from various thicknesses of styrene sheet.
The reactor spine is made up of 2 parts that sandwich together, the upper part being scribed with panel detail.
Here you can see some upper hull detail panels and the main parts of the large hanger bay for the underside.
The extension plating around the hull trench area was made from 2mm wide by 0.5mm thick styrene strip. This was carefully measured and fit to the hull edge shape and glued in place.
Stay tuned for more.
Cheers,
The main lower hull parts were glued together at the bulkheads to establish the correct angle. The seam was then glued and reinforced in the inside with some stretched sprue melted into the seam with liquid glue.
The internal bulkheads were reinforced with some styrene angle glued into place.
Additional plating was then cut out and added to the lower hull.
Here you can see the upper hull parts, the lower reactor spine parts and the rear angled engine bulkheads all cut from various thicknesses of styrene sheet.
The reactor spine is made up of 2 parts that sandwich together, the upper part being scribed with panel detail.
Here you can see some upper hull detail panels and the main parts of the large hanger bay for the underside.
The extension plating around the hull trench area was made from 2mm wide by 0.5mm thick styrene strip. This was carefully measured and fit to the hull edge shape and glued in place.
Stay tuned for more.
Cheers,
Monday, June 21, 2010
Scratch build Star Destroyer
Well unfortunately the Crusader thank has been put on hold temorarily, even though it is so close to being finished.
This it what has taken my enthusiasm and full attention away from the tank.
I started this a few weeks ago, I got some template for a paper model for a star destroyer off the internet here:
Star destroyer origami
I printed these plans out sized to fit an A3 sheet of paper, fortuitously this is also the same size as the AMT star destroyer kit. This is usefull because to ease the construction burden I aquired some Arvey models star destroyer bridge and engine nozzles, these are all sized to fit the AMT Star Destroyer kit.
The paper templates were cut out and taped to sheet styrene, the styrene was then cut to shape using an Olfa 'P" cutter (a great tool for scribing styrene and cutting styrene using the scribe and snap method). I used 2mm thick styrene to get nice solid hull parts that would be resistant to warping.
The plating detail on the hull was then transfered onto the styrene by placing a sheet of carbon typing paper between the paper template and the plastic hull part and tracing over all of the linework. (This is where having a drafting background really paid off).
The carbon linework was then scribed into the plastic hull part using an Olfa 'P' cutter. This process took the best part of 2 weeks worth of work.
The resulting panel details on the hull more than justift yhe work that has gone into them I feel.
Please stay tuned for more.
Cheers,
This it what has taken my enthusiasm and full attention away from the tank.
I started this a few weeks ago, I got some template for a paper model for a star destroyer off the internet here:
Star destroyer origami
I printed these plans out sized to fit an A3 sheet of paper, fortuitously this is also the same size as the AMT star destroyer kit. This is usefull because to ease the construction burden I aquired some Arvey models star destroyer bridge and engine nozzles, these are all sized to fit the AMT Star Destroyer kit.
The paper templates were cut out and taped to sheet styrene, the styrene was then cut to shape using an Olfa 'P" cutter (a great tool for scribing styrene and cutting styrene using the scribe and snap method). I used 2mm thick styrene to get nice solid hull parts that would be resistant to warping.
The plating detail on the hull was then transfered onto the styrene by placing a sheet of carbon typing paper between the paper template and the plastic hull part and tracing over all of the linework. (This is where having a drafting background really paid off).
The carbon linework was then scribed into the plastic hull part using an Olfa 'P' cutter. This process took the best part of 2 weeks worth of work.
The resulting panel details on the hull more than justift yhe work that has gone into them I feel.
Please stay tuned for more.
Cheers,
Subscribe to:
Posts (Atom)