Pages


Sunday, August 14, 2011

Mig 21PF Fishbed D 1:48

This is my latest build the Academy Mig 21 PF Fishbed D. The kit is my first decent attempt at a natural metal finish.
The Academy kit went together quite well, provided that you join the forward and aft fuselage halves first prior to joining the left and right halves.

The Natural Metal finish was applied using alclad laquers, Duralumin, dark aluminium, magnesium, aluminium, pale burnt metal and jet exhaust, all applied over a primer coat of Tamiya white surface primer. Custom colours were mixed for the Russian interior green and Russian green wheels.

The plane was sealed with Gunze clear acrylic for decalling, and the Academy decals worked file but were a little brittle. The decals were sealed in with more Gunze clear and then a very light dusting of Gunze flat (mainly on the decals) achieved the level of sheen I was after.


Weathering was taken care of with a oil paint wash for the panel lines, a little oil paint streaking from hinge points etc and some Mig (appropriately for this plane) pigment smoke for the exhaust and rocket pods.

All in all I really enjoyed this build and am very pleased with the result...... now where is that Su7????

Monday, July 18, 2011

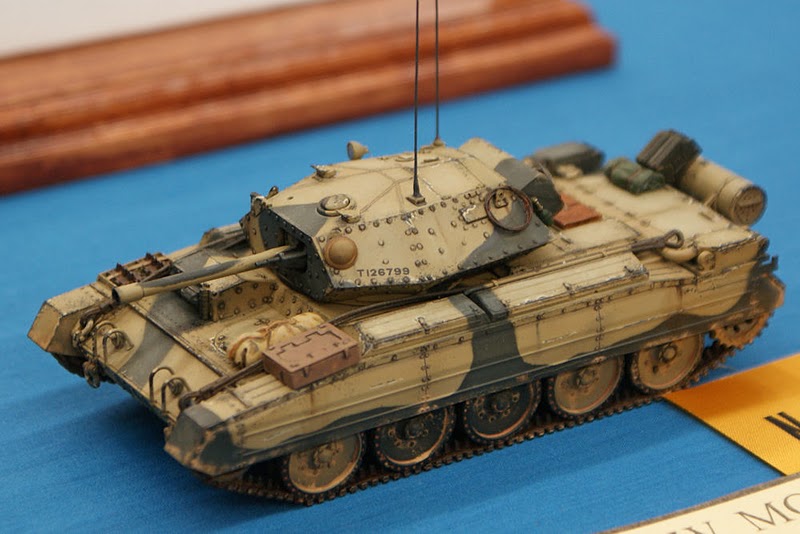
Tamiya Crusader III 1:48 Completed

Hello all,

Here I am with a new post, its been a little while since my last, some new projects have taken up a lot of my time. However I have been able to complete a kit that has been gracing my 'shelf of shame' for a while now, the Tamiya Crusader III in 1:48.

Unfortunately I did not document the last stages of this build, but I hope that you enjoy the images of the completed item.


The weathering consisted of oil pin washes, mig pigments and some oil paint streaking of various tones of brown white and rust. A little stowage was added from a legend set and the antenna masts and pennants were scratch built.

Cheers, until next time.

Saturday, July 2, 2011

Visit my new Website

Scale Central, a site for Plastic model news, reviews and updates.

Stay connected with the new Scale Central website;

http://scalecentral.com.au/

connect with us by email: http://feedburner.google.com/fb/a/mailverify?uri=ScaleCentral
or facebook: http://www.facebook.com/pages/Scale-Central/239353419409048

Tuesday, October 19, 2010

Engines and Things Part 3

I have had a short break from this project after suffering what is the modellers equivalent to writers block. However I have managed to complete the detailiing to the engine area (I think)!

 I added some subtle piping and greeblie detail to the secondary engine mounts and filled the rest in with suitable 'stuff' from the spares box.


 With that lot done I will now be free to permenantly attach the engines with epoxy, and move on to the additional hull detailing and then those dreaded shield generators on the top of the bridge.

Till next time,

Cheers,

Friday, September 24, 2010

Engine Bits & Details Part 2

Well I have managed to find something more difficult to make than the secondary engine mounts.....

The structures outboard of the main engines with the lines on them were a REAL pain to make, in the end I had to compimise with them fitting sligltly less than perfectly... Just not enough room for them. However having said that I think that they look the part.


I have also started to add the myriad of piping that is found around the main engines on these things. I am using styrene rod and half rod of varying diameters and simply bending it into shape prior to gluing it into place.


I am also making use of quite a few parts from model car kits in this area, particularly intake manifolds and exhaust headders.


It is very important to constantly test fit the main engines as I go to make sure that none of the detailing fouls their fit.


The level of detailing required in this area is quite daunting, however I find that if you add a basic layer of detail, it then becomes easier to come back over the same area & add another layer of piping etc and pretty soon it is looking suitably busy.


It is also worth noting tat all of the engines are still removeable at this stage (the secondary engines are blutaked to place). These will only be glued into place at the end of detailing work.


Overall the ship is really coming together now, and I'm inspired to get her finished. However one major obstacle remains..... mounting the resin shield generator domes....... not looking forward to that!!

Cheers,

Monday, September 20, 2010

Engine Bits and Details Part 1


The complex box shaped that the secondary engines are mounted onto were the first items to be made in tis area as their size and spacing it critical to the finished look of this area. The whole layout was determined by using blutac to temporarily mount the main engines and the boxes and a spacing that looked right was determined.

The main engines were then removed and the boxes glued into place.


I then drilled and pinned the hull to accept holes on the main engines. this should make a much more seure bond and allows me to add the main engines after all the detail work has been completed.


Here as you can see I have begun adding the piping details to the main engine recess, lots of differing sizes of styrene half rod creates the pipework and other details from the spares box that look right.

There is a lot of piping tat will go in here so stay tuned for more progress....

Cheers,

Tuesday, September 14, 2010

Engine Area Preparation


I have made a mould and a cast of the modified AMT secondary engine for my model. Here is the first cast of the part.


Here is the secondary engine and the ARvey models main engine laid onto the plans for checking the sizes. The hardest part of the rear engine works will be making the structures that the secondary engines sit onto as there are quite a few odd angles to deal with.


Here is a view of the reah of the hull, all permanently glued up ready for the engine are works to begin.

Until next time,

Cheers,
 
eScale Models Link Repository